Pages

Friday, 30 November 2012

Crochet Bowl Fest


The other day I saw a pattern for crocheted bowls on Jacquie's blog, BunnyMummy. It's a clever twist on the basic principles for crocheting anything in the round, like the base of a bag or hat and, if you will forgive the pun, I was well and truly hooked. By using a double strand of cotton yarn, as the circle becomes three dimensional, it holds its shape to be self-supporting enough to make a bowl to put your yarn or fruit in rather than being soft and flexible for a bag or a hat. The cotton yarn has less stretch and "give" in it than wool or acrylic and by using it double and on a small hook the crochet keeps beautifully tight with just the right amount of stiffness to hold itself up without the need for any additional support. You can find the pattern here.


By using every spare minute I've had this week, I've made two of these so far and I love them! Mine are slightly bigger than Jacquie's (I just worked a few more increase rows before working up the sides without any increases) but I have used her principle of changing the colours one strand at a time so that they blend nicely into one another. The stitch is just straightforward single crochet (US terms) / double crochet (UK terms) and the pattern is easy to follow and to adapt.


It's a bit stiff working with a double strand of DK weight yarn on a 4mm hook but you kind of get used to it and it helps if you put your hook in at an angle like I am doing here in the pic above.

This is my first effort in a symphony of blues. As you can see, if you look carefully, with some of the stitches I've missed going into both loops, giving little lines here and there. On my second attempt, the sunset / sunrise coloured bowl, I managed to avoid this. I think it's one of the hazards of working with a double strand so one just needs to be careful to go into the whole of each stitch as you work it. With the mottled overall effect I don't think it shows too much though.


The yarn I've used is Cascade Ultra Pima which comes in the most fantastic range of jewel shades. It has a slight sheen to it and is a dream to work with - no splittiness or awkwardness to it at all unlike some cotton yarn which can get quite raggedy on the hook. The only drawbacks are that it's not particularly cheap (for which, read, "not at all cheap") and it comes in those wickedly beautiful skeins that require Winding Before Use. I had quite a bit left over from my Japanese Flower scarf which, fortunately for this project, was therefore already purchased and wound!

When I was new to crochet I tried to use one of these skeins without winding and the cat's cradle that resulted in seconds was unbelievable to behold. If it hadn't been so expensive I'd have been tempted to bin the whole mess, but as it had been rather expensive, many hours and a lot of cursing and huffing and puffing followed, while I unravelled, painfully and slowly, what had only taken the blink of an eye to change from a smooth skein, lying innocently flat and serene on the table, to impenetrably tangled spaghetti with malign intent. So be warned, if you are a novice with skeins, and do not be tempted to take a shortcut with them - they do not like it and nor will you!

Not possessed of one of those handy "winders and swifts" or whatever they are called, I find the best method is to use two upright chairs, placed back to back and slightly apart and to place the carefully opened up skein in a loop round both backs. You can then find one loosened end and begin to wind the yarn into a ball. It's tiring on the back as I find I have to stand leaning over the chairs in order to keep the yarn flowing smoothly and not pulling away more than it should, but it's worth it with this stuff.


I am now on a third bowl experimenting with more clearly defined stripes which I want for something on Sunday so I've got to get a move on! Hope no one's expecting any supper this evening!

Happy Friday evening everyone!

Monday, 12 November 2012

Edelweiss Skirt

Some of you may remember my Deconstructive / Reconstructive sewing project where I recently went into uncharted (for Mrs T) sewing waters to design, from scratch, a replacement for a much-loved, but frayed, M&S denim skirt, courtesy of the magic instructions in "Sew What! Skirts". This little project had some denim fabric left over - probably because Mrs T's initial arithmetical calculation of the fabric required was a bit out - but hey, let's not carp if overestimating leads to another happy project such as this! Enter my Edelweiss skirt!


It's another denim skirt, but a short one - not enough fabric for another long one. I had to redesign my original pattern from a classic A-line to a straighter shape with less flaring for the short version as otherwise it would have stuck out too much at the sides. I know this, because my first attempt did stick out too much at the sides and had to be re-sewed to streamline it. This was another slightly unnerving foray into the unknown, as I had no idea whether simply taking the seam in, would do much good if the overall shape was out of kilter, but remembering my teenage days, when we all borrowed our mothers' sewing machines on the quiet and re-sewed the leg seams in our jeans to make them tighter-fitting, with never a qualm,  (anyone else remember doing this?) I took the risk. And it worked - the superfluous width in the sideseams, that had stuck out rather alarmingly when I tried it on, had disappeared and in its place emerged a new and streamlined, rather well-fitting shape. Probably more by accident than design, but never mind, who's telling?!

In the last couple of weeks or so I've been devoting every spare minute to Christmas present-making but this last weekend, with an unexpectedly free Saturday afternoon, in a sudden selfish urge, I threw off the present-making to make this for me. Sorry, but I did. And the good news is that it didn't take long - no more than a twinkle of an eye, in real terms.

I am so enjoying making garments that really fit me. Everyone has different quirks to their shape and commercial patterns, although they mostly allow you to shorten or lengthen them, don't offer the flexibility of drawing out something from your own measurements. It's been very encouraging too to discover that if it isn't quite right to begin with, it's possible to tweak it, until it is. Hitherto I've always felt that if a pattern hasn't ended up fitting very well, either it's my amateur sewing skills that are not quite up to the mark or it's simply not a good pattern for my shape and in either scenario there's not much I can do. But no longer!

It's also the case that wonderful though commercial patterns are and I have a whole stack of them, covering everything from babies' sunbonnets to adults summer dresses, toddler dungarees to skirts I've made for myself over the years, as well as pyjamas in a range of sizes to fit small boys and now big ones, they are quite expensive to buy individually. Being able to draw one's own pattern from scratch is going to save quite a lot of money. I don't feel confident enough to draw out anything too complicated (yet!) but you never know where it will end!

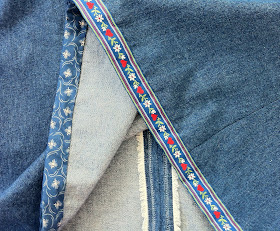
Making your own clothes is not always a frugal option - you can spend a fortune on beautiful fabric and handmade buttons, trimmings etc - and sometimes saving money isn't the point of the exercise but to be able to conjure up a new garment for next to nothing has a delight all its own. This was made entirely from what I had in the cupboard apart from the 20 cm zip for which I did have to splash out the princely sum of £1.90 - the fabric was leftover from the previous skirt (and even if I'd had to buy it I would barely have needed three quarters of a metre so we are talking Seriously Frugal Clothing here!), the bias binding (used to bind the facing and the false hem) was made out of a long term resident fat quarter from my fabric stash, the thread was a colour already in stock in my wooden, Belgian chocolate / reels of thread box and the finishing touch, the Edelweiss braid, I had bought a length of in Cologne.


And although I had given half the braid away, there was just enough left to make a wonderful Alpine-flowered border for this little number and two useful little loops to hang the skirt from. Perfect!


I feel I am too old now, in my late forties, to wear skirts that are too short but I do find plain, straight skirts above the knee comfortable and practical and they are perfect for pairing with thick, woolly tights and cosy cardigans in the colder months of the year. Which means most of the year in this country. While in Germany, I bought several pairs of wonderfully-patterned, thick, "Strumpfhose"- some stripy ones and some, I have to admit it, slightly startling ones, patterned with snowflakes and squirrels(!) There are not many days, in my book, that cannot be cheered by a pair of loudly colourful and patterned, thick, woolly tights. I know, I know, call me shallow if you will!! I am unrepentant! If you do not have such an article of clothing in your wardrobe I recommend investing in a pair pronto, to fend off the winter blues both literally and metaphorically.  They are a wonderful way of giving a whole new lift to existing clothing without spending too much or having to invest in a whole new outfit. Although to put the cost thing in perspective, the tights will cost you more to buy than this skirt would cost you to make, even from scratch!

Anyway as you can see, my new Edelweiss skirt pairs quite nicely, I think, with these jolly German stripes and "all is cosy, all is bright," to paraphrase the immortal words of "Silent Night"! Now I must get back on track with what I am supposed to be sewing and hooking in my free time! An update on some of that to come. My sewing machine has never worked so hard! You can see some of its output hanging up on the right of the pic but we had so much trouble getting a pic that was remotely decent (Mrs T is not at all photogenic) I didn't like to make the long-suffering photographer go round again to eliminate extraneous background!


Although having said that I need to get back to what was on my "to sew / to hook" list, the fact that this skirt needed so little fabric and was so quick and cheap to make, is singing a whispering siren song in my head that there may be other leftovers just waiting in the wings to rise like similar phoenixes from the ashes!

If you fancy a similar skirt yourself, have a go! It really was so easy - just draw out the top of the skirt as for a normal A-line one (as per the Sew What!) instructions and then instead of drawing a straight line flaring out from the top at each side all the way from waist to hem, take the flare only as far as the widest point of your hips and then draw a gentler line at less of an angle from your hip point to your desired length. Couldn't be simpler. And if, like me, you find the sides stick out a bit to begin with, just re-sew until you've got it how you like it.

Conventionally, short straight skirts tend to have their zips at the back so this is what I did with mine, simply making the back of the skirt in two panels instead of one with extra fabric allowed for the seam allowance in the centre back into which I inserted the zip instead of at the side.


Saturday, 3 November 2012

Babes In The Wood Crochet

As a small child I was addicted to fairy stories - I read all I could get my hands on and when new ones were scarce, I reread the old ones, time and time again. I had several, well-thumbed compendia of fairy stories, or "treasuries" as their old-fashioned titles described them. This is the frontispiece from my favourite one, which I still have on my bookshelf:


And I still remember the delicious frisson of joy I felt on discovering in the local, public library Andrew Lang's apparently unending series of colour-coded collections of fairy stories. Fairy tales from all over the world collected in The Orange, Red, Pink, Lilac, Blue, Crimson, Olive, Violet, Green, Brown, Yellow and Grey Fairy Story Books. Anyone else remember these? Originally published in the early 1900s, they were still populating bookshop and library shelves in the early 1970s. I think they have been given a new lease of life recently and are now again available for a new generation of fairy tale lovers.

Although all fairy stories were grist to my mill, some were better than others and some of course were a bit disappointing as far as the plot went. Not all were as powerful as "Snow White and the Seven Dwarfs", "Sleeping Beauty", "The Princess and the Frog" or "The Brave Little Tailor Who Killed Seven With One Blow", "The Wild Swans" or "Rapunzel" (How I longed to have hair as long as Rapunzel's! Even on one occasion going so far as to construct DIY Rapunzel braids out of long lengths of brown wool, plaited together and pinned to my short curly hair with hair grips!).

Snow White was a particular favourite - I was mesmerised, not so much by the seven dwarves, at that stage unreconstructed by Disney, but by the whole business with the talking mirror and the Poisoned Apple and Snow White lying in her glass coffin.


This had an unfortunate repercussion, when at the time aged four, I was taken by my mother to have tea with a rather old-fashioned and stiffly unbending friend of my grandmother's. I was under strict instructions To Behave, to Be Polite and Not Rush About. All went well until tea was served by this rather severe old lady, when, with Snow White's perils running in my head, I was given something to eat and I asked, in the clear and bell-like tones peculiar to a four-year old with a burning question requiring an urgent answer, "Is this Poisoned?!" Needless to say, my mother was mortified with embarrassment and had a hard time explaining away my inquiry. To me, aged four, in a world partly inhabited by real people and partly (and equally vividly) by fairies, giants, wicked witches and the like, who, at the drop of a hat and without a scruple, substituted poisoned apples for harmless ones, it seemed a perfectly reasonable question. I had some difficulty convincing my mother of this point of view at the time however!

Anyway, I am wandering away from the matter in hand, or rather on hook! One of the stories with the least satisfactory plot, I always felt, was The Babes In The Wood. Even as a small child, I found it unsatisfactory, especially the ending, where a too-convenient-to-be-credible grandmother was on hand to encounter the robin wearing the scrap of the little girl's hair-ribbon and one of the buttons from the little boy's coat that the grandmother remembered sewing on herself! Even aged four this seemed to me to be stretching credibility too far even though I had no problem with witches living in gingerbread houses and wicked fairies casting mean spells at babies' christenings! Clearly my logic, at the age of four or five, was deployed somewhat erratically! But despite what seemed unsatisfactory to me about the plot, (not least the fact that, once the children were found, the story simply ended with them being taken to their grandmother's cottage, with no proper pursual of the miscreant robbers), the idea of the children falling asleep and being covered with fallen leaves by the birds, to keep them warm, enchanted me.

How cosy to be covered by a light eiderdown of soft autumn leaves! In my mind's eye, of course, these leaves were not damp and rotting nor did they realistically harbour woodlice, spiders and other creepy-crawlies! They were dry, as light and soft as a feather and all the colours of a New England Fall. When I first slept under a duvet as a student, rather than under the old-fashioned sheets and blankets we had at home, it was this image that floated in my head.

What has all this, you will say, to do with crochet? Well, the image of being able to snuggle under a drift of autumn leaves has stayed with me all these years and while doing a bit of stash reviewing in September, I came upon the beautiful Sublime yarn I bought in the Spring when planning and making my "Glory be to God for dappled things" cushion cover. I needed earth colours and neutrals for this cushion, which are not my usual palette at all and, to be honest, I over-bought as I wasn't sure what I would need. Some of what was left I used up in the dahlia cushion for my mother's birthday but there were still quite a few colours untouched.

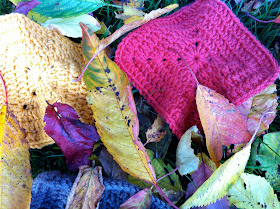
Watching the autumn leaves beginning to float to the ground...


... I realised that here was a beautifully straightforward opportunity to make my childhood image a reality. All the colours of yarn I had left over were straight out of the illustration of the leafy eiderdown in my old fairy tale book - rich deep brown and umber, burnished bronze and soft ochre, golden amber, wine-red and flaming-orange, old yellow and a soft evergreen, bleached ivory and old parchment. They echoed all the colours of horse-chestnut, ash and oak leaves, birch and maple, cherry and beech, sycamore, lime, elm and willow with a few delicate leaf skeletons, pale as bone among them. I chose a simple granny square pattern  and started crocheting my own pile of soft autumn leaves.


Most granny squares are quite "holey", if you know what I mean. I didn't want the "holey" effect for my leaves but more solid blocks of colour. After one or two "holey" experiments, I settled for an adaptation of the pattern that was on the ball band of some Peaches and Creme yarn, that Liz of Carolina Knits very kindly sent me from North Carolina and I am very pleased with the result - nice, solid blocks of colour with minimal "holes" and very easy to crochet neatly together. I prefer to do this after finishing the blocks rather than joining-as-I-go because I like to play around with the design combination when I can see all the colours that are in play and how they are going to repeat against one another.

My pile of simple, blocky granny squares grew steadily during September and is now a "Babes In The Wood" throw just big enough to snuggle under on a late-autumn evening when it is dark and chilly outside. It's not quite as big as I would have liked - more a lap-quilt than a full-size throw in size but I didn't have enormous quantities of each colour and I didn't want to buy any more as the whole point was to use up what I had. But I think there is room in the world for small and cosy as well as for big and enveloping. The kind of throw that as well as using inside on a chilly autumn evening one might take outside for a late picnic when it's really too cold just to sit, but the sun is out and still warm and the idea of sipping a mug of homemade soup among the autumn leaves appeals.


I've given it an accentuated picot edge adapted from Lucy of Attic 24's Granny Stripe edging (you can find her original edging pattern here.) I wanted an edging that resembled the delicately complicated edges of sycamore or maple leaves and I think it's worked OK. I have deliberately not blocked the finished crochet as I want the overall slightly crinkly effect of the fallen leaves it represents. It's deliciously warm and snuggly even though it's quite small and of course small means easy to wash and not so expensive or so long to make as a bigger blanket so I may pass this way again! 

Not with my slowly deepening sea-ripple however, which, (for good or ill!), will be much bigger when it's finished. That, however is having to wait in the wings a little while my Christmas present-making takes priority. 

There are, of course, loads of granny square instructions out there and you may well already have your own favourite but if you want to replicate my solid blocks of colour here's my adaptation of the Peaches and Creme pattern: (I've given the pattern here in UK terms. If you use US terms, just substitute double crochets for trebles.)


Chain 5 and join with a slip stitch to form a ring.

Round 1: ch 3 (counts as first treble of first cluster of four trebles), now, working into the ring, make 3 treble crochets, 2 chains, 4 trebles, 2 chains, 4 trebles, 2 chains, 4 trebles 2 chains. Join with a slip stitch to the top of the ch 3 you made at the beginning.

In round one you will have 4 stitches on each side of your square, separated by the chain spaces.

Round 2: ch 3 (as before, this makes the first treble of the first cluster of four trebles), make 3 trebles and now into the chain space make 2 trebles, 2 ch and another 2 trebles. Now carry on your trebles in each st until you reach the next chain space. Make sure you do not skip the first st after the chain space trebles - you need to continue the round starting in the very first st, which can get a little hidden by the second pair of chain space trebles. When you reach the next chain space, repeat what you did in the first one i.e. 2 tr, 2 ch, 2 tr before continuing your trebles on the next side. When you get to the end of the round, join with a slip stitch to the first ch 3.

In round two you will have 8 stitches on each side separated by the chain spaces.

Round 3: exactly as round 2 except that at the end you will have 12 stitches on each side separated by the chain spaces.

Round 4: exactly as round 2 except that at the end you will have 16 stitches on each side separated by the chain spaces.

Round 5: exactly as round 2 except that at the end you will have 20 stitches on each side separated by the chain spaces.

I made my granny squares five rounds each but of course you could make them bigger or smaller. Each round you add, will increase the stitches in each side between the chain spaces by a factor of four.

Now what other fairy tales might prove inspirational for a blanket? Sleeping Beauty with a thick hedge of dark green thorns and deep magenta and wine-coloured roses surrounding a pale pink and white and gold sleeping princess? Cinderella with drab, ashy colours on the outside leading the eye to dancing colours of ballroom silks and satins and at the centre a bright orange pumpkin patch? The possibilities are myriad and may keep me and my hook "happy ever after", as in all the best stories!


In the meantime, The Babes in the Wood have it!